Note from Rich
Chapters 12 and 13 really need to be rewritten from scratch.
I've left them here - you can read them, but the formatting is screwy.
Lablgtk and writing Gtk applications
Gtk+ is a toolkit for writing graphical applications, and lablgtk is the OCaml interface for Gtk. Gtk and lablgtk are available for Unix and Windows platforms. In this tutorial I'm going to concentrate on the older but more stable Gtk version 1.2. Gtk 2.x has some incompatibilities with Gtk 1.2, although mostly you won't notice the difference. On Windows, Gtk 1.2 has a non-native look and feel, but this is corrected in Gtk 2.x by the use of Gtk-Wimp (a Windows native theme for Gtk).
Lablgtk makes ambitious use of advanced features of the OCaml type system. Make sure you're familiar with labelled and optional arguments and polymorphic variants (labels) or you won't have any idea what's going on in this chapter. As it is, even the author of this tutorial finds ploughing through the lablgtk source code pretty hard work!
Simple lablgtk program
Actually, not so simple. This program has a menu with a "quit" option, and a button in the main area which you can press:
open GMain
open GdkKeysyms

let main () =
  let window = GWindow.window ~width:320 ~height:240
      ~title:"Simple lablgtk program" () in
  let vbox = GPack.vbox ~packing:window#add () in
  window#connect#destroy ~callback:Main.quit;

  (* Menu bar *)
  let menubar = GMenu.menu_bar ~packing:vbox#pack () in
  let factory = new GMenu.factory menubar in
  let accel_group = factory#accel_group in
  let file_menu = factory#add_submenu "File" in

  (* File menu *)
  let factory = new GMenu.factory file_menu ~accel_group in
  factory#add_item "Quit" ~key:_Q ~callback: Main.quit;

  (* Button. *)
  let button = GButton.button ~label:"Push me!"
      ~packing:vbox#add () in
  button#connect#clicked ~callback: (fun () -> prerr_endline "Ouch!");

  (* Display the windows and enter Gtk+ main loop *)
  window#add_accel_group accel_group;
  window#show ();
  Main.main ()
;;

main ()
Save this to a file simple.ml and compile it like this:
ocamlc -g -w s -I +lablgtk lablgtk.cma gtkInit.cmo simple.ml -o simple
This is what you should see when you run it: 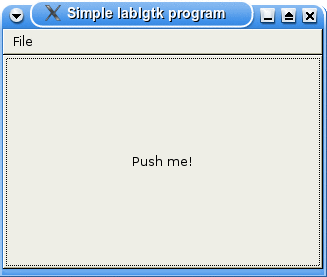
Let's analyse the program line by line to see what's going on.
open GMain
open GdkKeysyms
GMain provides useful functions like the Gtk main loop, so I find it a good idea to always open this module. GdkKeysyms provides some key definitions, in this case _Q for the Ctrl + Q key combination.
  let window = GWindow.window ~width:320 ~height:240
      ~title:"Simple lablgtk program" () in
  let vbox = GPack.vbox ~packing:window#add () in
  window#connect#destroy ~callback:Main.quit;
Firstly we create the toplevel window. Every Gtk program needs at least one. Notice three things: firstly GWindow.window is actually a helper function which creates a window object for you. For various reasons which we'll discuss in the intensive section at the end of this chapter, you shouldn't create lablgtk objects using new classname arguments..., but instead use one of these helper functions. The helper functions are often named the same as the class which they create. Secondly lablgtk makes extensive use of the ~label (labelled and optional arguments). You'll get used to this quickly. Thirdly see the apparently useless () (unit) argument to GWindow.window. It's actually not useless, but the only way for OCaml to tell the difference between a partial and full function application in the presence of optional arguments.
A vbox is a vertical layout widget. It's a container which contains other widgets but isn't normally visible by itself. The ~packing argument looks odd (indeed it is). It's just a shorthand way of writing:
  let vbox = GPack.vbox () in
  window#add vbox;
The two forms are, as far as I can tell, identical. The first way is a bit shorter.
window#connect#destroy ~callback:Main.quit; is an example of connecting a signal to a function. In this case the destroy signal, received by the window when someone presses the "X" in the corner, will cause a call to Main.quit () (note extra unit arg).
Creating the menubar and File -> Quit button is straightforward enough. Notice the accel_group object which is used to keep track of accelerator buttons. The menubar is packed first into the vbox:
  (* Menu bar *)
  let menubar = GMenu.menu_bar ~packing:vbox#pack () in
  let factory = new GMenu.factory menubar in
  let accel_group = factory#accel_group in
  let file_menu = factory#add_submenu "File" in

  (* File menu *)
  let factory = new GMenu.factory file_menu ~accel_group in
  factory#add_item "Quit" ~key:_Q ~callback: Main.quit;
Next up we create the button and pack it in the vbox. Notice the clicked signal which is connected to an anonymous function:
  (* Button. *)
  let button = GButton.button ~label:"Push me!"
      ~packing:vbox#add () in
  button#connect#clicked ~callback: (fun () -> prerr_endline "Ouch!");
This line just causes the accelerator keys (eg. Ctrl Q) to work:
window#add_accel_group accel_group;
Finally two lines which are essential. All Gtk widgets must be "shown" before they will appear, by calling the #show method. However lablgtk, by default, automatically shows all widgets except toplevel windows. Thus we need to call window#show () explicitly. Main.main () is the Gtk main loop - the bit which runs and handles events. Gtk is event driven so everything else happens in a callback as a result of some signal received.
  window#show ();
  Main.main ()
Gtk tutorial
Read this Gtk tutorial to find out more about Gtk. Lablgtk contains a pretty complete mapping of the Gtk+ API.
Graph widget
Now we're going to get a little bit more adventurous and write our own widget. This is going to be a simple graph, with a scrollbar at the bottom allowing you to scroll left and right through the data. The graph itself is going to be drawn on a Gtk drawing area widget. The Gtk drawing area is very simple, just an empty space in which you can execute your own drawing commands to draw lines, rectangles, text and so on.
Before starting we need to think about the overall structure of our graph widget. I'm going to have it be a vbox, with the drawing area in the top part, and the scrollbar in the bottom part. This is the overall structure of our class:
class graph ?width ?height ?packing ?show array =
  (* The initialization code will go here. *)

  object (self)
    inherit widget vbox#as_widget

    (* Methods will go here. *)

    method init =
      (* Further initialization will go here. *)
  end
To create a widget you will do:
let graph = new graph in
graph#init;
Note the two-stage initialization process. This is actually an unfortunate hack. You'll see why it's necessary once we start to fill in the code. Perhaps a reader can suggest a way around this?
The inherit widget vbox#as_widget is interesting. You'll have to read the section below entited Structure of lablgtk to understand it fully, but basically it causes a graph to be a subclass of widget.
Let's have a look at the initialization code in more detail.
class graph ?width ?height ?packing ?show array =
  (* Constants. *)
  let page_size = 10 in                 (* Number of bars on "page". *)
  let max_y = 10 in                     (* Maximum on Y scale. *)

  (* Number of data points. *)
  let array_size = Array.length array in

  (* Create the containing vbox. *)
  let vbox = GPack.vbox ?width ?height ?packing ?show () in

  (* Create the drawing area. *)
  let da = GMisc.drawing_area ~packing:vbox#add () in
  let drawable = lazy (new GDraw.drawable da#misc#window) in

  (* Create the scrollbar. *)
  let adjustment = GData.adjustment
      ~lower:0. ~upper:(float_of_int (array_size-1))
      ~step_incr:1. ~page_incr:(float_of_int page_size) () in
  let scrollbar =
    GRange.scrollbar `HORIZONTAL ~adjustment ~packing:vbox#pack () in

  object (self)
    inherit widget vbox#as_widget

    (* Methods will go here. *)

    method private repaint () =
      (* Repaint the widget. See below. *)

    method init =
      da#event#connect#expose
        ~callback:(fun _ -> self#repaint (); false);
      adjustment#connect#value_changed
        ~callback:(fun _ -> self#repaint ())

  end
The let-bindings before the start of object define constants such as page_size, but also create the Gtk objects like vbox, drawing area, scrollbar and adjustment. (An adjustment is an abstract object which records the position of a scrollbar. Notice how in the init method we attach a signal to the adjustment so that when the scrollbar moves (ie. adjustment changes) we repaint the whole widget.) The private repaint method is where the action is, as it were. That method will actually be responsible for drawing the graph, axes, title and so on.
We'll see that in just a moment, but let's concentrate on the simpler methods of the object first:
  object (self)
    inherit widget vbox#as_widget

    (* The title of the graph. *)
    val mutable title = "no title"
    method set_title t = title <- t
    method title = title

    (* ... *)
  end
The object is going to contain a mutable member, the title, and two methods to set_title and get title.
Now we come to the repaint method, which is the guts of the widget. This draws the graph in the drawing area:
    (* Repaint the widget. *)
    method private repaint () =
      let drawable = Lazy.force drawable in
      let (width, height) = drawable#size in
      drawable#set_background `WHITE;
      drawable#set_foreground `WHITE;
      drawable#rectangle ~x:0 ~y:0 ~width ~height ~filled:true ();
      drawable#set_foreground `BLACK;

      (* Draw the title. *)
      draw_text drawable font `Centre (width/2, 20) title;

      (* Draw the axes. *)
      drawable#line ~x:40 ~y:(height-40) ~x:(width-40) ~y:(height-40);
      drawable#line ~x:40 ~y:(height-40) ~x:40 ~y:40;

      (* Which part of the data to display? first .. first+page_size-1 *)
      let first_bar = int_of_float adjustment#value in
      let data = Array.sub array first_bar page_size in
      let bar_width = (width - 80) / page_size in

      (* Compute function mapping graph (x, y) to screen coordinates. *)
      let map (x,y) =
        (40 + x * bar_width, height-40 - y * (height-80) / max_y)
      in

      (* Draw the axes scales. *)
      draw_text drawable font `Right (40, height-40) "0";
      draw_text drawable font `Right (40, 40) (string_of_int max_y);
      for i = 0 to page_size-1 do
        let x = 40 + i * bar_width + bar_width/2 in
        let y = height-35 in
        let v = first_bar + i in
        draw_text drawable font `Centre (x, y) (string_of_int v)
      done;

      (* Draw the data. *)
      for i = 0 to page_size-1 do
        let (ll_x,ll_y) = map (i, data.(i)) in
        let (tr_x,tr_y) = map (i+1, 0) in
        draw_rectangle drawable "red" (ll_x, ll_y) (tr_x, tr_y)
      done;
      ()
Apart from the calculation of screen coordinates from graph coordinates, the repaint method is essentially very simple. The Gtk drawing area contains a drawable object, and we use methods on this object such as drawable#line plus some helper functions which I haven't reproduced here to draw in the drawing area. It's really just a matter of calculating what to draw, where. Notice how we freely access let-bindings made before object (self), eg. page_size, drawable, adjustment. These let-bindings are available in any method in the object.
The complete code for the graph is available in <a href="graph.ml">graph.ml</a> and <a href="test.ml">test.ml</a>. Compile it using:
ocamlc -g -w s -I +lablgtk lablgtk.cma gtkInit.cmo graph.ml test.ml -o graphtest
Here is a screenshot:
<img src="graphtest.gif" width="648" height="508" alt="Screenshot"/>
Structure of lablgtk
The lablgtk library has two layers, which I'm going to call the module layer and the object-oriented layer (plus some ancillary library modules which we'll also talk about). The layers are arranged like this in relation to your code:
| Your code | |
| Object-oriented layer | eg. gButton.ml |
| Module layer | eg. gtkButton.ml ml_gtkbutton.c |
| Gtk+ library (or DLL on Windows) | |
In theory you only need to interact with the object-oriented layer, and the theory is indeed true for trivial programs. However for practical purposes you will need to understand how the library is built up from these layers (and why).
Gtk objects
We'll start with the peculiarities of Gtk itself. This library is written in C and uses macros and "clever" hacks to (a) present an OO-ish interface and (b) perform simple garbage collection through reference counting. Part of the reason why lablgtk uses quite a complex model is to cater for the implementation of Gtk itself.
All "objects" in the Gtk library (I'll call them objects, but in reality they're C structs) are "derived" from GtkObject. This means that an object such as a button contains within its struct a struct _GtkObject. This "base class" contains, amongst other things, a reference count which is used to provide simple garbage collection.
Of course, the above is all in the context of a C library for C programmers. OCaml has other mechanisms for OO and contains an advanced garbage collector. How does lablgtk unify the two?
Lablgtk starts with this type definition (in module Gtk):
type 'a obj;;
On the face of it, this is a very strange type definition. It defines a polymorphic type called obj (polymorphic because you can create, say, int obj, etc.). But it doesn't actually define a way of creating these objects! [Recall that a normal type definition might be something like this:
# type 'a obj = Something of 'a;;
type 'a obj = Something of 'a
which gives you a very definite way to create, say, an int obj:
# Something 1;;
- : int obj = Something 1
But our strange, bare definition just says:
type 'a obj;;
How do we create objects of this type? The answer is that we don't. Instances of type 'a obj are GtkObject structures (actually, more likely they are "subclasses" of GtkObject), and they are created by the C library. What precisely happens is that the C functions in the Gtk+ library are wrapped up by C functions which are called from OCaml. These functions look like this:
CAMLprim value
ml_gtk_toggle_button_new (value unit)
{
  return Val_GtkObject_sink ((GtkObject *) gtk_toggle_button_new ());
}
Val_GtkObject_sink is a very complex little function which wraps up the GtkObject returned from the Gtk+ library function gtk_toggle_button_new () in something that OCaml's garbage collector can understand. The same function also deals with Gtk's reference counting.
static void ml_final_GtkObject_sink (value val) {
 if (Field(val,1))
   gtk_object_unref ((GtkObject*)Field(val,1));
}
value Val_GtkObject_sink (GtkObject *p) {
 value ret;
 if (!p) ml_raise_null_pointer ();
 ret = alloc_final (2, ml_final_GtkObject_sink, 20, 1000);
 initialize (&Field(ret,1), (value) p);
 gtk_object_ref_and_sink(p);
 return ret;
}
OCaml code calls ml_gtk_toggle_button_new directly to create objects of type 'a obj. Module GtkButton is in lablgtk's module layer and it contains an inner module called GtkButton.ToggleButton containing a function defined as:
module ToggleButton = struct
  external toggle_button_create : unit -> toggle_button obj
      = "ml_gtk_toggle_button_new"
  external toggle_button_create_with_label : string -> toggle_button obj
      = "ml_gtk_toggle_button_new_with_label"
  let create_toggle ?label () =
    match label with
      None -> toggle_button_create ()
    | Some label -> toggle_button_create_with_label label
You can call these functions directly to see what they return:
# GtkButton.ToggleButton.toggle_button_create ();;
- : Gtk.toggle_button Gtk.obj = <abstr>
# GtkButton.ToggleButton.create_toggle ~label:"Push me!" ();;
- : Gtk.toggle_button Gtk.obj = <abstr>
Notice the return type: toggle_button obj (ie. a definite instance of the polymorphic type 'a obj). What is toggle_button? It's a type (think 'a list vs. int list) defined like this (in module Gtk):
type widget = [`base|`widget]
type container = [widget|`container]
type button = [container|`button]
type toggle_button = [button|`toggle]
Hence the full type written out is:
type toggle_button = [`base|`widget|`container|`button|`toggle]
(These are polymorphic variants - see <a href="../ch7/">Chapter 7</a> if you don't remember them).
If you check the Gtk class hierarchy you'll see that the list of variants closely (but not exactly) matches the classes. A Gtk toggle button is-a Gtk button, Gtk container is-a Gtk widget, etc.
Object-oriented layer
Now let's look at the object-oriented layer interface to the toggle button, so we can see how 'a obj comes into play. The GButton module defines a class for toggle buttons, but unusually you don't directly create instances of this class using new toggle_button (or similar). Instead a function is provided which generates instances for you. Here it is, simplified somewhat:
let toggle_button ?label ?border_width ?width ?height () =
  let w = ToggleButton.create_toggle ?label () in
  Container.set w ?border_width ?width ?height;
  new toggle_button w
Recall that w has the abstract type [`base|`widget|`container|`button|`toggle] obj, and it wraps up the actual GtkObject allocated by the C library.
A toggle button is-a container, and the next thing we do is call Container.set to set some properties in the base class. Here is where the polymorphic variants become interesting. What is the type of Container.set?
# GtkBase.Container.set;;
- : ?border_width:int ->
    ?width:int -> ?height:int -> [> `container | `widget] Gtk.obj -> unit
= <fun>
Container.set is expecting an argument of type [>`container|`widget] obj. Recall from our discussion of polymorphic variants that [>`container|`widget] means "a variant which contains at least `container and `widget, and possibly other things too". Now go back and compare with the definition of toggle_button type above.
So w of type [`base|`widget|`container|`button|`toggle] obj is compatible with the call to Container.set, expecting [>`container|`widget] obj.
Finally our function actually creates the class, passing the widget w as the parameter to the class. The class is defined like this (simplified):
class toggle_button w = object
  inherit button w
  method connect = new toggle_button_signals obj
  method active = ToggleButton.get_active obj
  method set_active = ToggleButton.set_active obj
  method set_draw_indicator = ToggleButton.set_mode obj
end
The base class for all objects is GObj.gtkobj defined as:
class gtkobj w = object
  val obj = w
  method destroy () = Object.destroy w
  method get_id = Object.get_id w
end
So all classes, including toggle_button, have access to their underlying object (the GtkObject allocated in C) through the obj member, and have #destroy and #get_id methods. All classes derived from widget have a public #as_widget method which returns the underlying object (sadly there is no equivalent for gtkobj, although this doesn't matter so much since almost all interesting classes are widgets).
Let's try the OO interface for toggle buttons:
          (* call the toggle_button function *)
# let b = GButton.toggle_button ~label:"Push me!" ();;
          (* note: returns object from toggle_button class *)
val b : GButton.toggle_button = <obj>
# b#as_widget;;
          (* note: returns a widget obj == [`base|`widget] obj *)
- : Gtk.widget Gtk.obj = <abstr>
Downcasts
Gtk is dynamically typed, and this means you can <dfn>downcast</dfn>, for example, a widget into a toggle button. Gtk requires downcasting in some instances: for example you can pack widgets into containers, but if you try and retrieve them out of the container, all you get is a list of widgets. The original type of the widgets is lost. Assuming you know that a widget is really, say, a button, then Gtk requires you to downcast the widget to a button in order to use the button-like features.
Such an operation is normally illegal in OCaml because OCaml is strongly typed at compile time and downcasting is unsafe. The widget might or might not actually be a toggle button. Lablgtk allows downcasting, and provides another mechanism for casting which avoids the explicit downcast. Whichever way you do it, you may get a runtime exception if you cast to the wrong type.
The simplest downcast is just to unwrap the 'a obj (GtkObject) from one class and wrap it in another class. Here we take the children out of a table widget, which we happen to know are actually all vboxes, unwrap each one from the widget class and rewrap in a GPack.box class. (Example due to Jacques Garrigue.)
let vbox_of_widget widget =
  let obj = GtkPack.Box.cast widget#as_widget in
  new GPack.box obj;;
let vboxes = List.iter vbox_of_widget table#children;;
The terminology might be a little bit confusing here because the #as_widget method returns the internal GtkObject of type 'a obj.
GtkPack.Box.cast does the actual unsafe downcast. Downcasts can always fail at runtime, and in the case above the Cannot_cast exception could be thrown. You should be prepared to deal with this - unfortunately it's a program bug which cannot be picked up at compile time.
The other method for doing this avoids the explicit downcast, but can still throw an exception indicating a program bug at runtime. The strategy here is to remember what objects we put into the container separately, and when we take them out try to match them up. We use the GUtil.memo class for this:
class ['a] memo () = object
  constraint 'a = #widget
  val tbl = Hashtbl.create 7
  method add (obj : 'a) =
    Hashtbl.add tbl obj#get_id obj
  method find (obj : widget) = Hashtbl.find tbl obj#get_id
  method remove (obj : widget) = Hashtbl.remove tbl obj#get_id
end
(The constraint essentially says that 'a must be a widget, or some subclass of widget).
Here is an example of using a memo. First we will create a top-level window, a container (vbox) to go inside this, and a button:
# let w = GWindow.window ();;
val w : GWindow.window = <obj>
# let c = GPack.vbox ~packing:w#add ();;
val c : GPack.box = <obj>
# let b = GButton.button ~label:"Push me!" ();;
val b : GButton.button = <obj>
Before we pack the button into the container, let's create a memo to remember the real object. Notice how the type of the memo is refined as soon as the button is added:
# let m = new GUtil.memo ();;
val m : _#GObj.widget GUtil.memo = <obj>
# m#add b;;
- : unit = ()
# m;;
- : GButton.button GUtil.memo = <obj>
Now we can add the button to the container, remembering to upcast it to a widget first of course:
# c#add (b :> GObj.widget);;
- : unit = ()
The method #children returns a list of widgets. Not much use to us:
# c#children;;
- : GObj.widget list = [<obj>]
But we can use our memo to map these widgets to the original button objects:
# List.map (fun w -> m#find w) c#children;;
- : GButton.button list = [<obj>]
Remember that this is still dynamic casting, and so unsafe. In this case the memo will throw a Not_found exception if the widget cannot be mapped:
# let b2 = GButton.button ~label:"Don't push me!" ();;
val b2 : GButton.button = <obj>
# c#add (b2 :> GObj.widget);;
- : unit = ()
# List.map (fun w -> m#find w) c#children;;
Exception: Not_found.
Structure of lablgtk - summary
GtkObjects allocated by the C library are wrapped up in opaque'a objabstract types.- The module layer is flat (not OO) but uses polymorphic variants to simulate a class hierarchy.
- The module layer handles Gtk's reference counting for you transparently.
- Classes in the OO layer store the opaque
GtkObjectin a member calledobj, and perform operations through the module layer, usually passingobjas the first parameter. - Helper functions are provided to create instances of classes.
- Lablgtk provides two ways to perform downcasting, but this doesn't change the fact that downcasting is unsafe and can throw exceptions at runtime.
<a href="../ch13/">Chapter 13</a> continues with a discussion of wrapping up external C libraries. We look at another way to wrap up Gtk.